During the early days of Dizzy Pig, Mike Kerslake wrote this primer on slow smoked pulled pork. Since then, we’ve adopted a different technique for our competition barbecue pork. We’ve shared our technique in a detailed recipe.
Want to see our new technique for Pulled Pork? Check out our Recipe!
Competition-Style Pulled Pork Recipe
Pulled Pork is one of the classics of barbecue cookery. It starts with the humble pork shoulder, a tough and fatty cut. It is then slow smoked until it has rendered much of its fat and connective tissue. The resulting meat is tender and smokey delicious.
“Boston Butt”, “Picnic Roast”, “Pork Shoulder” or “Shoulder Blade Roast” are all names for shoulder cuts that make great pulled pork. While there are some basic guidelines and tips on this cook, it is one of the easiest, most forgiving of the BBQ standards to produce.
Here’s my approach to cooking up pulled pork.
Choosing and Trimming Meat
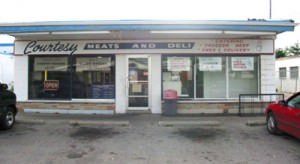 For me, pulled pork starts with a trip to the local meat shop. It’s always a wonderful thing when you have a place that is ‘yours’ and you are recognized as a regular. That place, for me, is Courtesy Meats here in London, Ontario, Canada.
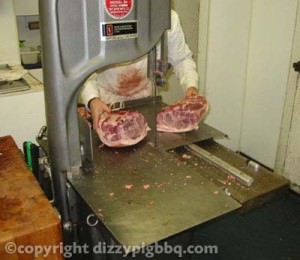
The owner/meat cutter, Roy Simpson, is always willing to go that little extra to make sure I get the best results in my bbq cooking. Today, he’s going to do me the favor of cutting a whole shoulder down into its component parts, the picnic roast and the Boston butt roast.
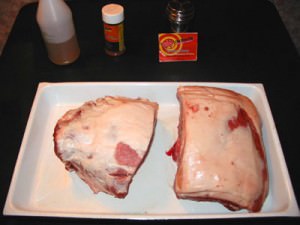
The guest of honor at our pulled pork dinner is a whole shoulder roast, weighing in at approximately 16 lbs. The rind has been removed from the majority of the shoulder, and that part is what will constitute our butt roast.
 The portion of the roast covered by the rind is what makes up the picnic shoulder roast. You can attempt to cut the two apart yourself, but you best have a good bone saw! There’s no guarantee that you will hit the joint that connects these two cuts.
With the meat saw, Roy makes short work of separating the two roasts. The butt portion will be the larger of the two, at about 9 or 10 lbs. The picnic in the 5 to 6 lb range.
Back at home, I cut off the rind from the picnic roast. That leaves a good amount of fat cap which will help self-baste the meat as it cooks low n’ slow. Some folks will cut to the surface of the picnic roast, apply seasonings and then put the rind/fat combination back over top.
Seasoning
The tools of the trade for seasoning a butt in my house are what you see here. An injector and needle to pump seasoning liquid into the heart of the roasts. A combination of apple juice, Worcestershire sauce, apple cider vinegar, corn syrup and dissolved Dizzy Dust seasoning is what I use.
 In addition to the injection liquid, the roasts receive a generous coating of Dizzy Dust Coarse Blend. This blend has larger grinds of peppers, sugars, herbs and spices. Designed to adhere to these bigger pieces of meat, it also keeps burning temps for the coarse sugar high. This blend can definitely hold up to a long, low and slow cook!
Also in the picture you’ll see the spritz bottle. This is an apple juice and apple cider vinegar mix (8 parts juice to each part vinegar, approximately). The meat will get an occasional spritz, starting about 2-3 hours into the cook and then every hour or two thereafter.
Cooking and Temperature
A pork picnic or butt roast can be excellently flavored with almost any fruit or nut wood. Apple, cherry, hickory and pecan all produce excellent results.
A digital remote thermometer will allow me to monitor the internal temperature of the meat as it cooks. Cooking at an average of 225-240°F at grill level, these two roasts will take anywhere from 1.25 to 2 hours per lb to cook.
They will settle into what is known as the plateau for an extended period during the cooking process. This is the point where the majority of heat energy from the burning charcoal is going into the breaking down of fats and connective tissue in the meat. Therefore, the internal temperature, as read on the remote thermometer, will stall for a period of hours.
When a majority of the fats and tissues have been rendered, the roasts will resume their climb in internal temperature. When the desired final temp is reached, they are removed from the cooker.
A roast is finished to the point of being ‘slice-able’ around 170°F and over and ‘pullable’ at 195°F and above. Some cooks say 200°F is ideal, some even go to 210°F or more.
After the roasts reach that internal temperature of 200°F, (my personal preference), they are removed from the cooker and left to rest on the counter while preparations are made to ‘pull’ or shred the meat.
Serving
If the roast is 200°F internally, chances are it is almost falling apart as you remove it from the cooking rack. To ‘pull’, you simply need to shred the meat, either by hand or by working two forks, tines facing apart, against the surface of the pork. The resulting pieces and strands are what constitute ‘pulled pork’. …

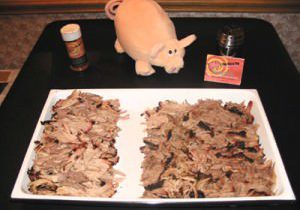
After a long, low n’ slow cook, the two roasts are almost fully rendered. All that remains are the bones, some fat and skin. As you can see, there is not much from the 16 lbs of pork that has not rendered out! Between this bit of waste and what gets cooked off, you can expect about a 60% yield from your original raw weight. That would mean that the results here, picnic roast meat on the left, butt roast on the right, would net a little less than 10 lbs worth of pulled pork; enough to satisfy a good-sized Super Bowl party crowd!
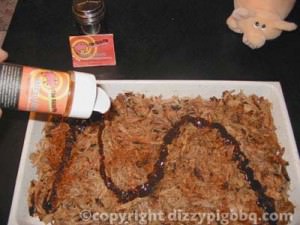
To finish up presentation of the pulled pork, I add some sweet KC-style barbecue sauce, (you may prefer a thinner vinegar-based sauce, or even none at all!), and a good sprinkling of Dizzy Dust Regular Grind in order to freshen up the spice flavor in the meat. A quick mix and you are ready for a gathering of friends and family!
Enjoy!
Ingredients
Print Recipe- 1 whole shoulder roast, weighing approximately 16 lbs
- Dizzy Pig® Dizzy Dust Coarse Blend
- Seasoning liquid mixture of apple juice, Worcestershire sauce, apple cider vinegar, corn syrup and dissolved Dizzy Pig® Dizzy Dust seasoning